Thursday, December 27, 2012

Rainbow Bridge

Over the weekend, we lost a loved member of our family, our cat Pippi.  This was especially horrific for our 8 year old daughter.  Pippi was her birthday gift from her Papa for her 3rd birthday.  To help her cope, a good friend had us look up the poem Rainbow Bridge.  This helped her calm down and realize that she is in a happy place.  For those of you with children and animals, keep a copy of this poem to help them cope during times like this.


Just this side of Heaven is a place called Rainbow Bridge...
When an animal dies that has been especially close to someone here, that pet goes to Rainbow Bridge. There are meadows and hills for all of our special friends so they can run and play together. There is plenty of food and water and sunshine, and our friends are warm and comfortable. All the animals who had been ill and old are restored to health and vigor; those who were hurt or maimed are made whole and strong again, just as we remember them in our dreams of days and times gone by.
The animals are happy and content, except for one small thing: they miss someone very special to them; who had to be left behind.
They all run and play together, but the day comes when one suddenly stops and looks into the distance. The bright eyes are intent; the eager body quivers. Suddenly he begins to break away from the group, flying over the green grass, his legs carrying him faster and faster. You have been spotted, and when you and your special friend finally meet, you cling together in joyous reunion, never to be parted again. The happy kisses rain upon your face; your hands again caress the beloved head, and you look once more into the trusting eyes of your pet, so long gone from your life but never absent from your heart.
THEN YOU CROSS RAINBOW BRIDGE TOGETHER...


Tuesday, December 11, 2012

Winter Prep

Over the past few years, I have become increasingly interested in self sufficiency.  I was raised in a hunting/fishing family.  My mom even kept a garden for some time.  The thought of being able to provide for yourself in such a way gives me a sense of pride.  The past two yers my garden has failed.  I blame it on three things, the kiler summer sun, the excessive heat, and the drought of 2012.  It is December, and I am in full planning and preppuing mode for my garden next year.  I have moved my garden from a spot that gets full sun all day, to a spot that gets full sun until about noon, then the shade blocks out a little of the sun for a few hours.  I have also expanded my plot.  I also plan on using a green house cover to help expand my growing season.

Does self sufficiency interest your family?  What are some ways you help to provide for yourself?

Wednesday, December 5, 2012

Swagbucks: Holiday Hundreds Giveaway


Swagbucks is working to make the holidays even more rewarding with their Swagbucks Holiday Hundreds Giveaway. Starting at 12pm Pacific Time on November 14th every transaction you make through the Swagbucks Shop & Earn will get you an entry to win the $100 Gift Card of your choice from the Swag Store! As soon as the Swag Bucks show up as pending in your ledger, your entry has been earned! The first drawing will take place on the 19th and will run every day through the 14th of December - if you're the winner, Swagbucks will contact you at whatever email address you have on your account. Entries are cumulative, so the more transactions you make, the more entries you'll get. Travel Category is excluded.


Haven't joined Swagbucks yet? Sign up today and enter the code HOLIDAY100s to start with 100 Swag Bucks of your own!
 

Tuesday, December 4, 2012

Swagbucks: Expedited Shipping Is Here!


Just in time for the holidays, Swagbucks has brought back Expedited Shipping on all of the Amazon Gift Cards in the Swag Store. Starting November 1st, all you have to do is order and verify your gift card by 2pm PT to get it the next business day, select the Expedited Shipping option and chip in an extra 50 Swag Bucks! It's super simple and if you haven't verified your account it can be done easily via cellphone.

 
Sign up for Swagbucks today!

Saturday, October 27, 2012

Eclairs....YUM!


This is a post I originally posted on my other blog, The Crazy Life of a Pantry Cook

I love eclairs, but they tend to be a bit pricey at my local grocer, so we only get them every so often. My father-in-law had asked me to make up a bunch of cupcakes for his work. They loved them so much...but they wanted to know if I could make eclairs. After much research, I realized that they are easier to make than I thought. Even better, I had everything I needed for them already, except the heavy cream (but then again, who keeps heavy cream in their fridge at all times?). I found a super simple recipe over at
Hidden Ponies. Here is the recipe that I used, along with my own additional comments:


Easy Eclairs

Serves: 10
  • CHOUX PASTRY:
  • ½ cup butter
  • 1 cup water
  • 1 cup all-purpose flour
  • ¼ tsp salt
  • 4 large eggs
  • CUSTARD FILLING:
  • 1 (4 serving size) package instant vanilla pudding mix
  • 2 cups milk (or as called for on pudding package)
  • 1 cup heavy cream
  • ¼ cup icing sugar
  • 1 tsp vanilla extract
  • ¼ tsp salt
  • CHOCOLATE ICING:
  • 2 oz semisweet chocolate (or ⅓ cup semisweet chocolate chips)
  • 2 Tbsp butter
  • 1 cup icing sugar
  • 1 tsp vanilla extract
  • 3 Tbsp hot water
Instructions
  1. Preheat oven to 450 degrees. Lightly grease a large cookie sheet and set aside.
  2. In medium saucepan, combine ½ cup butter and water. Bring to a boil, stirring to melt butter.
  3. Reduce heat to low and stir in flour and salt with a wooden spoon until the mixture begins to form a stiff ball of dough.
  4. Remove from heat and add eggs, one at a time, stirring vigorously after each addition to ensure they are incorporated. Work quickly, especially with the first one, to prevent it from cooking into scrambled eggs on the bottom of your warm pan :)
  5. With a spoon or pastry bag fitted with a large tip, spread/pipe the thick dough onto prepared cookie sheet into 10 strips approximately 1½ x 4″ each. (**I piped different sizes to see which worked best....make your pastries a little bigger than the size of your thumb.)
  6. Bake for 15 minutes, then reduce heat to 325 and bake another 20 minutes, until puffed and golden and hollow sounding when lightly tapped on the bottom. When removed from oven, IMMEDIATELY pierce the ends almost through to the other side to let steam escape and prevent any sogginess in the middle. This hole is also where you will be piping your filling into. Let cool completely before filling and icing (this will only take about half an hour).
  7. For CUSTARD FILLING: combine pudding and milk in a bowl and mix according to package directions. In a separate bowl, beat the heavy cream with an electric mixer until soft peaks form. Beat in ¼ cup icing sugar, 1 tsp vanilla, and ¼ tsp salt. Fold whipped cream into pudding. (**The custard was too thin, even after refrigeration, so I added a little bit more powdered sugar, and I will probably use a tad bit less cream, maybe 6oz. vs. 8oz.)
  8. Scoop mixture into pastry bag fitted with a smallish tip (I enlarged my steam holes a bit to make my tip fit, so do whatever works) and pipe mixture into centers of eclairs until full. This is a bit of a messy business, but worth it for ease of eating and pretty appearance. You could certainly also just slice the eclairs in half horizontally, fill the bottoms with cream, and replace the tops. Either way, you will probably have some custard leftover.
  9. For ICING: Melt the chocolate and 2 Tbsp butter over low heat in a saucepan (or in the microwave, stirring after 30 seconds and giving additional 10 second increments as needed until fully melted). Stir in 1 cup icing sugar and 1 tsp vanilla. Stir in hot water, 1 Tbsp at a time, until icing is smooth and reaches desired consistency. Drizzle, pipe or spread over filled eclairs.
  10. Store in the fridge.
 

*The great thing about using the pudding for this recipe is that you can change the flavor of your eclair by using a different type of pudding! I may try chocolate or banana next time.

Friday, October 12, 2012

His & Her Mugs

I keep seeing these super simple DIY mugs floating around Pinterest.  You probably know the ones I'm talking about....the cute his & hers mugs.  I decided to add this little project to my always growing "Pinterest To-Do List".  Like with any project you find on Pinterest, there is a good chance it will fail, but for $2.....this project was worth it.


Here is how my mugs turned out!  Please disregard my sloppy handwriting.  How did I make them?  Simple......2 dollar store mugs....doodle or write on them....and bake them at 350 degrees for 30 minutes.  Viola'!  My daughter and I are going to doodle on one and give it to her teacher for Christmas.  :)  These hold up well to hand washing.  I think this project was a success!  Dollar store, here I come!

*Do not use in the dishwasher., you may lose part of your design.


Update (Nov. 6, 2013):  It's been over a year since I did this project.  One mug still has the design, while the other doesn't.  I blame the fact that I used a scrubby pad (whoops) on one of the mugs.  Regardless, it would be easy to redo my design onto the mug in question.

Wednesday, August 22, 2012

Honey Fried Chicken

I love fried chicken! But, I know that I can't have it as much as I would like. This past weekend we tried to trim a few calories from the chicken by frying it without breading. This is one of those dishes that my hubby stops eating, looks at me, and tells me how much he loves me! I think that this may have become a quick favorite!

Ingredients
2 whole (bone-in) chicken breasts
2 tbsp honey
Vegetable oil
Chicken seasoning (recipe follows)

Directions
Heat your oil to 350 degrees. Pat your chicken dry. Do not season it at all. Put your chicken breasts in the fryer and cook at 350 degrees for about 20 minutes. Remove from the oil. Sprinkle the chicken seasoning over the top of the chicken and put back into the oil to fry for another 20-25 minutes at 350 degrees. Once your chicken is cooked, it will have a nice crust on the outside. At this point, you will want to mix 2 tbsp of honey with 1 tbsp of vegetable oil and 1 tbsp of your chicken seasoning. Spread over the outside of your chicken and serve.

Mrs. T's Chicken Seasoning
2 tbsp. smoked paprika
1 tbsp. chili powder
2 tbsp. onion powder
2 tbsp. garlic powder
1 tsp. pepper
2 tbsp. salt
2 tbsp. sugar

Tuesday, August 21, 2012

Golubtsy, a Russian Comfort Food


One of my husband's favorite foods is cabbage, so I am always on the hunt for new ways to cook it.  My husband's favorite cabbage dish would have to be golubtsy, or cabbage rolls.  Golubtsy is a Russian dish that consists of meat wrapped in a cabbage leaf and then stewed.  I have come across many versions of this dish, each one tasting as delicious as the other.  Here is how I make it:

Ingredients
Head of cabbage
Ground beef
Rice
Onion
Tomato paste
Can of beer
Paprika
Worcestershire sauce

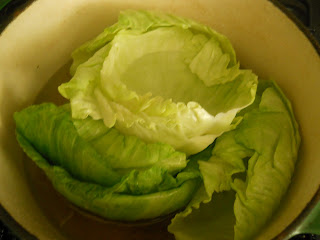
For my recipe, I use 8 big leaves from a head of cabbage.  Boil the leaves until tender. 
*To make this easier, I boil the whole head and peel the 8 outer leaves.  This leaves me with the rest of the head which I continue to cook and save for another meal.

Chop and saute your onions until translucent.  
In a bowl, mix together 1 lb of ground beef, 1 cup of cooked rice, 1 tbsp of paprika, 1 tbsp of Worcestershire sauce, and the cooked onion.

Spoon mixture into the center of each leaf and roll (into a burrito shape).
In a separate bowl, mix together a 1/4 cup of water, 1 can of tomato paste, and 1 can of beer.  This will be your sauce.

In the bottom of a Dutch oven, spread a spoonful of sauce to create a bed for the rolls.  Place your rolls seam side down.

Pour the remainder of your sauce over the rolls.  Cook over medium-high heat for about 45 minutes, the meat will have steamed inside of the rolls.  Serve with the sauce and a spoonful of sour cream.  This recipe serves 4-8 people (depending on how hungry your bunch is...my family had one per person).


Here is a Dutch oven I would recommend for those of you who would prefer to not cook with a cast iron one.  This is a very reasonable price and it is great quality.  You can use your Dutch oven for many different types of dishes.  This is honestly one thing I could not live without in my kitchen, I cook everything in mine!


Saturday, August 11, 2012

The Crazy Life of a Pantry Cook: Homemade Dog Treats

Pictured: apple dog treats
Check out this post I did today on homemade dog treats!  So far I've made bacon, cranberry, and apple. My dog has loved all three flavors (and her cousin and best friend did as well!!!!)  The base recipe if gluten free and organic, just in case you were wondering!

The Crazy Life of a Pantry Cook: Homemade Dog Treats: I know, this isn't a snack you can actually eat, but we can't leave man's best friend out, can we?  It seems like it has become harder to find healthy snacks for dogs....

Wednesday, August 8, 2012

Recycling Lettuce

My new growth after one week.
Most of you may remember my post on recycling green onions, well this is the same concept, but with romaine lettuce.  As long as the rot stump is in tact you can place it in a shallow bowl of water and watch it regrow!  I've had my stump in water fir about a week now.  I love food that you can regrow and get a second life out of; it helps you stretch your food budget!  What types of produce do you like to "recycle"?


Yahoo post on regrowing vegetables.

Wednesday, July 18, 2012

The Crazy Life of a Pantry Cook: Canning Tomatoes: My First Attempt

If you head over to my other blog, you'll get to see my first attempt at canning tomatoes.  Do you think I failed or succeeded?  The Crazy Life of a Pantry Cook: Canning Tomatoes: My First Attempt: I am still fairly new to canning, so bear with me on this one.  Summer is canning season simply because that is when fruits and vegetables ...

Thursday, July 12, 2012

Summer's Harvest: Blueberries & Strawberries

When I think about summer, I think about BBQ and fruits.  Summer brings us a variety of fruits and vegetables.  Two of my favorites are strawberries and blueberries.  Not only do they scream summer, but they are full of vitamins and antioxidants.  Their sweet flavor makes them perfect to enjoy in desserts, for breakfast, or even just by themselves.  Too often are they overlooked as being a delicious ingredient during your summer cooking.  Here are some recipes that I have found that help bring out the delicious flavor of these fruits!


Blueberry BBQ Sauce
Pickled Blueberries
Spinach, Goat Cheese, and Strawberry Salad
Almond Chicken with a Strawberry-Balsamic Sauce
Blueberry and Cranberry Relish
Strawberry Balsamic Dressing
Blueberry and Peach Chutney

New York Strip with Blueberry-Port Sauce
Ingredients
2 tbsp minced shallots
1 cup frozen (thawed) or fresh blueberries
1 1/2 cups of Port
1 cup beef broth
2 tsp sugar
1 tsp chopped fresh rosemary
1 tbsp unsalted butter
4 (8 ounce) New York strip steaks
2 tbsp canola oil
Salt and pepper

Directions
In a saucepan, combine the shallots, blueberries, port, broth, and sugar.  Bring to a boil over medium-high heat.  Boil for about 1 hour, until reduced to 1/2 cup.  Remove from the heat and stir in the rosemary and butter.  Keep warm.
Prepare a fire in a charcoal grill or preheat your electric or gas grill to high.  Pat the steaks dry, brush both sides with the oil, and season to taste with the salt and pepper.  Place on grill and cook for 4 to 5 minutes on each side for medium-rare.  Remove from the heat and set aside to rest for 5 minutes.  To serve, drizzle each steak with 2 tbsp of sauce.

Originally posted on The Crazy Life of a Pantry Cook.

Sunday, July 8, 2012

Joys of Motherhood

So here I am, trying to get my 22 month old son to sleep who will fight you to the death if you give him anything but a bottle of milk to fall asleep with.  I want to hold my ground, but the poor guy fell down the stairs two days ago.  Yep, he somehow got over the gate and opened the basement door as I went down to grab the laundry.  Besides the bruise and scraps, he's been such a trooper.  He even smiled and said "hi Mom" when I frantically ran over to pick him up.  Guess that's what you get when you have a son!  Then there is my 7 year old daughter, who is my everything.  She has been really into this video game for the past week.  Today I told her it was time to play with something else and give the TV and video game a break.  After the stomps and door slam, I notice a sign placed outside her bedroom door.  "Do not disturb."  Between my little man giving me heart attacks with his dare devil acts and my daughter's new found snotty attitude, I have myself wondering how I'm going to survive the next 16 years!  (Maybe put them in the closet so no one gets hurt!)  However, I do get lots of laughs (and plenty of hugs and kisses).  I guess this is what they mean by the joys of motherhood.

Thursday, July 5, 2012

Ticket Stub Collage Project

I like to keep things.  Ok, maybe I like to keep everything!  But I'm by no means a hoarder.  I know when it's time to let something go.  But when it comes to sentimental objects, there is no letting go.  I have large tubs full of everything from pictures, to ticket stubs, to cards, everything that means anything.  So I was browsing around on Pinterest one day (as I normally do), and I came across a pin for a ticket stub collage.  Of course, I have plenty of tickets, so it had to be done!  This project was so easy, I don't need step by step photos.  All you do is pick out your frame.  Place your tickets in any arrangement on inside of the frame (I used a tiny bit of tape to make sure nothing moved.  You can bend, fold, or cut the edges that overhang before you put the back on.  Then you just hang it up.  That simple!  I gave this to my hubby for Valentine's Day, but I had to add a few more tickets today!  Now to find a great craft idea for all of these cards!  

Wednesday, July 4, 2012

The Crazy Life of a Pantry Cook: Cookies n' Cream Cucpakes

One of my "semi-homemade" recipes I have featured on my new blog.  I hope that all of you take a moment to check out my new blog and become a follower.  Thank you and enjoy!

The Crazy Life of a Pantry Cook: Cookies n' Cream CucpakesOne thing that I am for praised is my cupcakes.  Most I bake from scratch.  Everything from the batter to the frosting.  But I'll admit, there are some that I use boxed cake mix for.  There is nothing wrong with doctoring up a box of cake mix.  In fact, one of my daughter's favorite cupcakes comes from using this method, as Sandra Lee calls it, the semi-homemade method......  

Sunday, July 1, 2012

16 Pounds Down!

April 19th 2012 is the day I decided to change my life for the better.  It's been a slow process, but I am down 16 pounds, and one pant size.  I don't feel the difference or see it when I look at myself, but I can see it when I look at my before picture, and my current picture.  For a few weeks now the progress has been slow, if not halted.  I knew the plateau was coming, but I wasn't expecting it so soon.  My trainer told me my body will get used to the routine if I continue on it.  So now it's time for a change.  Just for now.  Weight Watchers has been a great tool, but I need to get serious.  In addition to Weight Watchers, I have been working out twice a week, mainly doing weights.  For one week (starting July 10th), I am going to stick to water only.  No soda, no juice, and no wine (sigh).  I have also decided on a strict diet.  Don't think for one second I'm going to starve myself.  On the contrary, I'm going to eat more!  However, I will be staying away from processed breads and pasta this week and enjoy fresher foods, like salads, veggies, and fruits!  That week I plan to work out 5 days, and doing more cardio than weights.  Three at the gym and two at home (planks and stairs, he we come!).  Maybe by switching my life up I will shock my body back into gear!
July 1, 2012 - 248 lbs.
Before: April 19, 2012 - 264 lbs.

The Crazy Life of a Pantry Cook: Three Days of Pizza

I have decided to branch off of this blog a bit (don't worry, it will not be neglected).  I just wanted to showcase my recipes in a different environment!  So, for all of my followers, I ask that you head over to The Crazy Life of a Pantry Cook and become a follower there as well!  To start of, I shared my Three Day of Pizza posts that I had posted on this blog!  Hope you enjoy it!

The Crazy Life of a Pantry Cook: Three Days of Pizza: If you are joining me from my sister blog, Motherhood and Money , then you probably read my "Three Days of Pizza" series.  I paid approx. ...

Thursday, June 28, 2012

French Bread Pizza


So here I am again, third day in a row, with my cheese, pizza sauce, and pepperoni.  In total, I have spent $12 and have created 3 meals.  Tuesday it was the Garlic Bread Pizza and yesterday we had the Pizza Rolls.  I bought two loaves of French bread (so I still have one loaf left over for sandwiches tomorrow....can you say panini!) which cost me $1.50.  Building the pizzas were simple.  You cut your bread in half, top it with your sauce, then the cheese, and for us....pepperoni and tomato.  I baked the pizzas at 350 degrees for about 15 minutes.  Couldn't be simpler!  I have dubbed the past three days as "Three Days of Pizza"!  Enjoy!

Wednesday, June 27, 2012

Pizza Rolls

Yesterday I posted about the awesome idea Pizza Hut gave me with the Garlic Bread Pizzas.  YUM!  Well, as I mentioned, I had plenty of ingredients leftover.  Dinner for 4-8 people (depending on how hungry everyone is) last night cost me $8.  So for lunch today, we made little crescent roll pizza bites.  After doing the math, lunch for me and my two kids today cost us only about $4!  BTW....I still have some cheese and pepperoni leftover!  I did run out of sauce (which cost me $.35 to make anyways).  

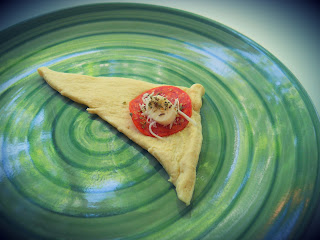
 Separate your crescent rolls (I bought a few cans when they were on sale for $1).  Place one pepperoni, a small amount of shredded mozzarella cheese, a little oregano, and a piece of string cheese (I cut up a stick of string cheese, $.25, and put a small piece on each roll).

Roll up your crescent roll making sure to tuck the sides in (you don't want your cheese to spill out the sides!).

Line them up on your baking dish.  Make sure the oven is preheated according to the directions on the can, and bake just like you would a regular crescent roll.

Let the rolls cool for a moment before serving.  These were cheap to make and a hit with the kids!


Tuesday, June 26, 2012

Garlic Bread Pizza


So the other day, I was going through my mail, when I came across a Pizza Hut ad for Garlic Bread Pizza. The first the to pop into my head was "why the F didn't I think of that!"  Of course I had to make some now!  It would be wrong if I didn't.  Right?  This ingredients cost me $8 (plus I have enough cheese, sauce, and pepperoni left to make two more meals using garlic bread, french bread, or crescent rolls).


Ingredients:

Garlic bread (I used Texas Toast brand with the cheese on it!)
Pizza or pasta sauce (I actually took a can of tomatoes, $.35, oregano, basil, and a dash of wine, blended and simmered it.)
Mozzarella cheese
Pepperoni slices
Tomato (I had one sitting around)


Directions:


Line your garlic bread in a baking dish.  Top with sauce, cheese, and then toppings (in that order).  Bake according to the directions on the box of garlic bread,  Feeds 4-8 people.


It's as simple as that!  And it was such a hit with my family too!  I've got a can of crescent rolls in the fridge, so I think I'll try pizza roll bites tomorrow with my leftover ingredients!  Bon' appetite!  

Saturday, June 16, 2012

When the Dinner Bell Rings: The Super Easy Way to Getting Meals Ready ~ DUMP CHICKEN

Every once in a while I'll stumble across another blog with such great information or recipes, I feel it is my duty to share.  I mean, what kind of person would I be if I didn't?  Right?  Well, here is yet another Pinterest find (because you know I'm in love with Pinterest)!  Time to clear out some room in my freezer and get some gallon size freezer bags ready!

When the Dinner Bell Rings: The Super Easy Way to Getting Meals Ready ~ DUMP C...: What is Dump Chicken? Dump chicken is one of the easiest forms of Freezer cooking! The idea is VERY simple, do NOT over think it. You t...

Thursday, June 14, 2012

Education

Last week I was sitting down with my husband.  He was preparing for his college graduation.  I started to feel like I have yet to find my place (I mean, besides being a mommy and a wife).  I had not finished the business degree that I let my hubby talk me into (yuck.... business!).  As I was sitting there, I started thinking about our current education system.  Times are changing, and more is expected of people, and the basis for a person is what they learn in elementary school.  So as I sat there thinking, I blurted out, "I want to be a teacher".  Without even thinking, my husband's response was "you'd make a great teacher, I think you should enroll in school."  Within the next 48 hours, my husband had found a school with a great education program, helped me fill out an application, and I was given a counselor and enrolled.  Not even a week later and I am scheduled for my first class.  It's amazing how quickly things can move!  I asked my hubby what he thought of me going back to school, and he said that's what he wanted from me all along, but he never wanted to force it onto me.  And when I asked him about my choice in majors, he said that he knew I would chose it eventually.  (On a side note, my grandmother has been teaching for 60+ years).  Here we go....the start of yet another adventure in my life!

Monday, June 4, 2012

Summer Safety Tips

If you are a fan of Motherhood and Money on Facebook, you may know that I am an admin on a page called Mommy's Place.  Mommy's Place is a page that focuses on mom's......giving advice, answering questions, and giving you a place to vent.  Recently, we started a blog for this page.  One of our first posts was about summer safety.  With summer finally here, I wanted to share the safety tips we posted on our blog. 
Drowning:  Although great fun for the kids, water can be dangerous. Nearly 1000 kids die each year by drowning, which makes it the second leading cause of accidental death for ages 5-24.  Kids need constant supervision when around all types of water, even a wading pool. Young children can drown in as little as 2 inches of water!  It is best to start your kids in a swimming lesson with qualified instructors.  Never assume even a kid who has had swim lessons isn't at risk of drowning. It is best to keep weak swimmers and young swimmers within arms distance. 

Make sure you are using a coast guard approved floatation devices. There are lots of different styles to choose from.  Make sure you choose the best one for your child.  If you are going to be riding in a boat, make sure you get one that is approved for boat riding. Unfortunately, the stylish swimsuits with the built in floatation device is not approved for riding in a boat. Also, the wing floaties are not effective against drowning, they are just there for a little extra help. 
Pool Rules:  It is important to make sure your kids have and follow pool rules.  Public pools may have a set of rules already in place, make sure your kids read and understand them.  If you have your own pool, make up a set of rules and consequences for not following the rules.  Remind them why you have rules and what could happen if something did happen.  Supervision is needed at all times, even if your kids have taken swim lessons and are wearing life vests.  There should be appropriate safety equipment at all pools.  Even when it is not swim season, pools can pose a threat.  Make sure your kids know that pools with covers can be extremely dangerous.  Make sure your kids know that covered pools cannot be walked on.  If someone walks on a covered pool or accidentally fall into a covered pool, they can drown fast from being trapped in the pool. 
Lake, Ponds, and Beaches:  Lakes, ponds, and beaches can be very dangerous for children.  They need to be supervised at all times. Sometimes you cannot tell when it gets deeper and it can drop really fast without you knowing.  It is very smart to make sure your kids wear foot protection since you do not know what is in the water. Never let children get too far out due to boats and being far away from help.  If you at the beach, teach your children about being aware of sea animals.  At the beach, or in a strong current, teach your kids to swim parallel to the shore or to just tread water until you can get someone's attention for help.  

Water Safety:  When you are swimming outside, beware of bad weather and teach your child to get out of the water when they see lightning and to let adults know.  Water illnesses can be extremely bad.  Make sure to take lots of bathroom breaks and drink lots of water so they don't get dehydrated.  Make sure to have a swim diaper on your child, if you have a child who is not potty trained.  Leaky diapers can spread bad germs throughout the pool and as we all know it is hard to keep our mouth close 100% of the time in the water.  Other swimmers can get severe diarrhea, nausea, vomiting, and dehydration from swallowed water. 
Skin Protection:  Swimming can be fun for the whole family and is great exercise. Sometimes we get caught up in having so much fun and forget to put on one of the most important things, SUN SCREEN.  Sun exposure is a great source of vitamin D but it doesn't take much time in the sun for most people to get too much sun.  The sun's UV rays can cause skin damage, eye damage, or even skin cancer. 
A sunburn means your skin's melanin is less than the amount of UV exposure that it can protect against. Unprotected sun exposure is even more dangerous to kids with moles, very fair skin, or a family history of skin cancer (ex. melanoma).  One of the biggest mistakes is parents think since there is an overcast that their child doesn't need sunscreen.  UV rays can travel through clouds and reflect off of sand, water, concrete, etc.  Sunscreen should be at least SPF 30 and applied every few hours, even with high number SPF sunscreens.  Make sure your sunscreen protects against UVA and UVB rays, and never buy sunscreen that contains PABA (para-aminobenzoic acid), chemical-free block is best.  Apply sunscreen at least 15 minutes before sun exposure and make sure all areas are protected. Never assume that darker skin color means the child can not be affected by the sun's harmful rays.  It is not advised to put sunscreen on kids under 6months of age.  Appropriate clothing such as sunglasses, hats with wide brims, or even a long sleeve swimsuits are best.  Umbrellas or any type of shade is a must when out in the sun, all kids need a place to get away from the sun.  If your child does develop a sun burn, apply aloe on all areas and give them an anti-inflammatory (ex. ibuprofen).  If your child gets a severe sunburn and blisters develop, do not pop the blisters and call the doctor.  Keep your child in the shade until the sunburn is gone.

I hope everyone has a SAFE and HAPPY summer!

Saturday, June 2, 2012

Freezer Meal: Pita Pizza

A few weeks ago, I had posted about the day I spent cooking up a months worth of meals.  As you also know, I am dieting (Weight Watchers baby!).  Convenience and diet friendly don't always go hand in hand, so making a lunch for me that was delicious, easy, and diet friendly was a challenge I was willing to accept.  But in fact, it wasn't hard at all.  One of the lunches I chose was the frozen pita pizzas.

Here's how I made them:

I took one whole wheat pita bread (low in fat and carbs, but high in fiber), topped it with one serving (2 tbsp) of pizza sauce (you can make your own if you can't find one low in fat), one serving of low fat cheese, and then any veggies you like!  For me, I wanted tomatoes.  Bake you pizza on 350 degrees for 5 minutes just until the cheese is melted.  Once cooled, wrap and freeze!  


When I felt like pizza, I'd pull my frozen pizza out of the freezer, pop it in the microwave for 1 1/2-2 minutes until nice and hot.


I love dipping my pizza in wing sauce and ranch.  So to complete my lunch, I used my ranch "dip" and a little splash of hot sauce.  My ranch dip is one tub of fat free/low fat sour cream and one packet of dry ranch mix.


Now, for all of you Weight Watchers fans....the Points Plus value of the pizza alone.....2!  Adding my ranch "dip" added 1 extra point.  3 points for lunch!  Good deal!

Enjoy!

Wednesday, May 30, 2012

The Plateau....

With every diet comes the dreaded plateau, the part of your diet where your weight doesn't budge at all.  I have lost 12 pounds since the start of my diet, but it seems as though the past two weeks I have been stuck at 252/253 lbs.  This is the moment where I have to chose what comes next....stick with the same routine, or kick my butt into overdrive and switch some things up.  12 pounds is a big deal, but it's only a small part of my big goal.  Starting tomorrow, I must keep it in my head that I can do anything, and I will.  

Here are some photos I found via Facebook that are meant to help motivate me:


(Exact sources of photos unknown)

Saturday, May 26, 2012

My Summer Bucket List

Ok, I'll admit it, I am addicted to Pinterest!  The problem is I keep pinning all of these awesome craft ideas, but have yet to do any!  I told my husband that this summer, I was going to create a bucket list of DIY crafts and projects.  I am still building my list, and I hope to include lots of crafts that my kids can help with.  But for now, I have a select few I would like to start with:
  1. Treat stands 
  2. Blinged out birthday candles 
  3. New flooring in my stairwell
My list is continuing to grow, but these are the three I have chosen to start with.  And you know I'm gonna have to share them with you as I do them!  But for now, you can watch my list grow on my Summer Bucket List board on Pinterest

Happy crafting!

Thursday, May 24, 2012

12 Down and Never Going Back!

So, today marks the 5th week of doing Weight Watchers Online.  In that time, I have joined a gym, as you probably know already.  I work out two days a week right now.  So far I have dropped 12 pounds and one pant size.  I have lost 1 inch in every part of my body.  I have more energy and feel better than ever.  I got to thinking, after my first kid, I took Stacker 2 to try to lose weight.  While I didn't lose any weight, I didn't gain any (which is always a good thing).  However, I wasn't dieting or exercising.  So I got to thinking.....what if I added some sort of supplement to my routine?  I have heard a lot of success (when done right) with Hydroxycut.  My package should arrive next week, so we shall see if this will indeed give me the edge I need.  I am currently 3 pounds away from being under 250!  That means only 53 more pounds until I'm finally under 200 for the first time in 8 years!
Starting Weight: 264
Current Weight: 252

I am motivated, I am confident, I will do this.

Saturday, May 19, 2012

Product Review: Tweeten's Greetins

I was recently sent a pack of greeting cards from Tweeten's Greetins - Handmade Greeting Cards as a thank you gift for spreading the word about this vendor.  And naturally, when I receive a product (especially on I love) I have to do a review on it!  Jennifer, the owner, has a collection of pre-made designs to choose from.  But as most vendors do, she will also let you customize any design you like!  You can change colors, images, and even add any sentiment to the inside!  You can buy individual cards, or buy them in bulk. 


Here are the cards I received:


The cards were well made.  In fact, I have order handmade cards elsewhere before, and they did not meet the same quality standards that Jennifer has set for herself.  All three cards were stamped with Tweeten's logo on the back and also included an envelope.  When I say these cards were well made, I mean just that.  You can tell Jennifer took her time on each card to ensure that I would be satisfied and that none of her work would be early damaged.  All designs are very much secure to the card.  I can honestly say, that next time I am looking to purchase a handmade card, I will turn to Tweeten's Greetins!


Owner: Jennifer Tveten
Facebook: https://www.facebook.com/tweetens.greetins
URL: http://tweetgreet.storenvy.com/
Email: Tweetgreet@yahoo.com 

Thursday, May 17, 2012

One Month Check In

I have now been on Weight Watchers for one month.  My starting weight was 264 lbs.  One month later, I am down to 253 lbs!  11 lbs. lost!  Since my last update, I have joined a gym.  My first day was an hour long, super-charged work out with my personal trainer.  I have been going two days a week, and hour each day.  Since the start of my diet, I have almost cut out soda completely.  I"ll admit, I'll have one or two when we go out.  But at home, water for me!  I have so much more energy now!  I have also noticed a change in my skin.  I'm not breaking out all over my face anymore.  This week though, my work outs have been limited, I got stitches in my finger on Mother's Day and now have a toddler with a fever from teething.  I'll update you again next month, I just hope this keeps on working!

May 13, 2012


May 17, 2012: One Month Mark ~ 253 lbs.
Down 11 lbs. from my start date,
down 4 lbs. from my last update. 


Wednesday, May 9, 2012

Cooking Once a Month?

A while back I had expressed my interest in freezer cooking.  It saves time and money, so it just makes sense to try out.  As you also know, I recently started dieting (again).  So as I was searching for recipes, I came across a page called Once a Month Mom.  I can not tell you how happy I was to find this site!  They have menus for diets, toddlers/babies, traditional menus, vegetarian menus, and even  dairy/gluten free menus!  This site is designed to teach you how to shop and prepare an entire months worth of meals in one day.  I don't have a giant freezer (cough, cough...Mr. T....if you're reading this...Mother's Day is Sunday!), so I don't think a months worth of meals (breakfast, lunch and dinner) will fit in there.  So I'm starting smaller.

To start, I have combined some of my recipes with some of the recipes I found on Once a Month Mom (with a few adjustments to fit my families needs).  Here are the meals I chose:

Lasagna (I'm doing two versions, traditional and a white sauce)
Chicken Enchiladas
Stuffed Shells
Honey Orange Chicken
Chicken Burritos
Chicken Spring Rolls
Stuffed Buffalo Chicken
Chicken Kiev
Buffalo Chicken Wraps
Caesar Chicken (shredded chicken for sandwiches)
Pita Pizzas
Mexican Chicken Casserole
Cheesy Hash Brown Casserole
Egg Casserole

I chose these dishes since most of the ingredients are the same for different dishes.  I will post my shopping list as I finish it (watch for Cooking Once a Month Part 2).  I will also post each recipe as I make each dish.  Recipes that are not my own have been linked accordingly.  Happy cooking!


Saturday, May 5, 2012

Published and Proud!

Over the past two months, I have written six articles for Yahoo, four of which were published!  Now, I'm not one to toot my own horn, toot-toot, but I am pretty proud of myself!  It is my hope, that one person who reads my articles, will be able to learn something from them.  With that said, here are my four articles that are currently published!

Living on One Income

From One Woman to Another: Advice on Men

How to Make a Natural Stick Candle Holder

Recipe: Crock Pot Tacos

Thursday, May 3, 2012

Recipe: Caribbean Pork Sandwich


I have recently become a fan of the Hungry Girl series on Food Network.  This past Saturday was a show all about sandwiches!  YUM!  So anyways, this morning I was prepping my pork chops for dinner and I noticed I had an extra.  Now, a lot of times, leftovers don't get eaten, and I can't stand to watch a perfectly good chop get cooked and not eaten!  I decided to eat it for lunch!  And am I sure happy I did!

The result.....my Caribbean Pork Sandwich!


Here's how I made it:

Ingredients:

1 boneless pork chop
1 tbsp. Caribbean jerk marinade
1/4 yellow (or red) onion
1/4 of a yellow (or red!) bell pepper
5 chunks of pineapple (or one ring), in juice
Two slices of bread (I used white)
1/2 tbsp. of butter
1/2 tbsp. of mayo
1/2 tbsp. of steak sauce
1 tsp. of honey
1 slice of American cheese
1 tomato

Directions:

1. Marinate your pork for about an hour.  Before you grill your pork, pound it flat.
2. In a non-stick skillet or grill, grill your flattened pork chop with your pepper, onion, and pineapple.
3. In a small bowl, mix together the mayo, steak sauce, and honey to create your sauce.
4. Flip your pork chop. 
5. Butter one side of each slice of bread.  Toast your bread in a separate skillet as it you were making grilled cheese.
6. Spread sauce onto untoasted side of bread and add cheese on top of it allowing it to melt slightly.
7. Once your meat is cooked, place veggies, pineapple, and pork onto your bread. 
8. Slice tomato, top sandwich, and viola!  You are finished!

With the ingredients I used, the Weight Watchers point value is 11 points per serving.  Please keep in mind, I used ingredients I had on hand, most of which are not fat free.  I am sure if you would like to make this a bit healthier, you can use lower fat mayo, butter, and cheese as well as use wheat bread.
Also, I used my skillet, but I'm sure this would taste even better if I grilled the onion, pepper, and pineapple!

ENJOY!

Thursday, April 5, 2012

Win a Trip to Vegas from Swagbucks!

 
Staring on Tuesday, April 10, 2012, Swagbucks is looking for The Ultimate Swag Mom!  What makes an ultimate swag mom?  She is the mother of all Swaggernauts; an avid user who not only knows her way around the site and the ways to maximize her earnings, but is also there to lend a hand with tips and advice for her fellow Swaggernauts.
 
You'll be able to nominate a friend or yourself, and if you get the most votes, you'll win the Grand Prize: A trip for two to Los Angeles, where you'll board a Private Jet Charter to Las Vegas for a relaxing two night Spa Vacation! Even if you don't win the grand prize, you could win an identical trip for two just for voting!  The winners will be announced on Mother's Day!
 
Be sure to check Swagbucks.com on Tuesday for all the details!"

Brought to you by Swagbucks and Eljet